Creating a connection to MySQL
07/09/20 16:53
Let's create a regular connection to your MySQL database. For this, your MySQL database needs to be reachable via the internet, and you need to have its hostname, port-number, username, password and database name.
When I write hostname here, that usually looks like a string with dots between it, like "mydatabase.mydomain.com". Other times, you might have an IP address, like "192.168.0.10", for instance when connecting to a server on your local network. In this document I'll use the word hostname to refer to either.
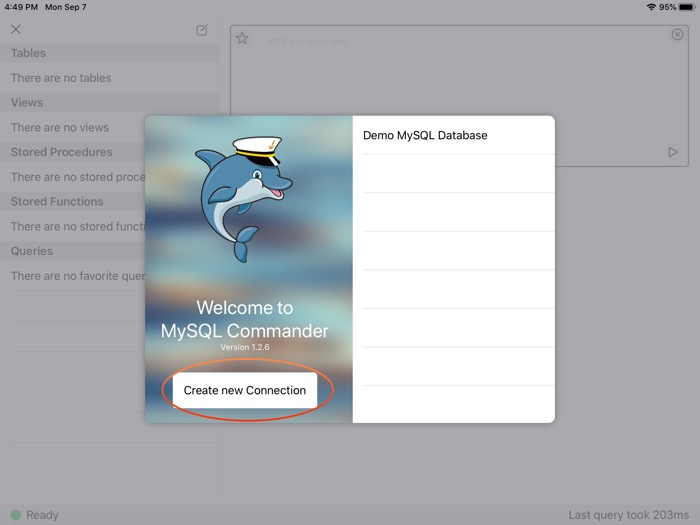
When you launch MySQL Commander for iPad, tap the button called "Create new Connection"

Figure 1: The app launched, with the "Create new Connection" in the bottom left

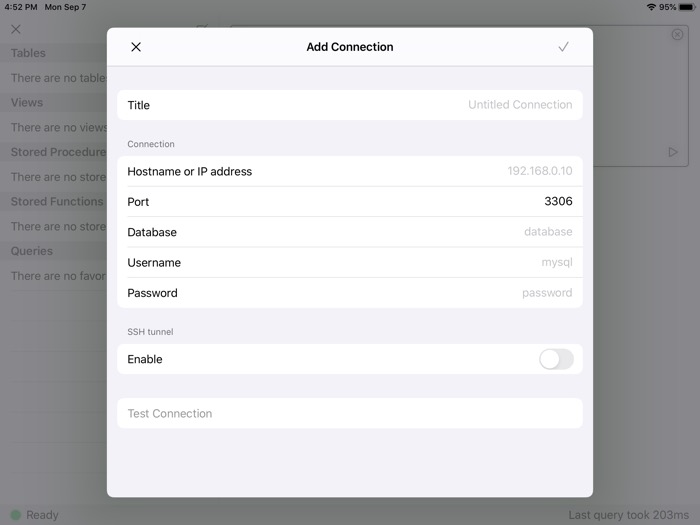
Figure 2: The "Add Connection" screen.
Then let's choose a Title, by tapping the right-hand side of the Title row. Unless you have an external keyboard attached, the iPad keyboard should appear. If you have an external keyboard attached, you can see the cursor blinking on the far right. You can now type the desired connection title.
After that, repeat for the rows "Hostname or IP address", "Database", "Username" and "Password". If your port-number is not the default 3306, edit it to the correct value too. If you have an external keyboard, you can use the tab key to jump between the fields. Otherwise, just tap the row you want to edit.
We're not going to enable an SSH tunnel for now, so leave it disabled.
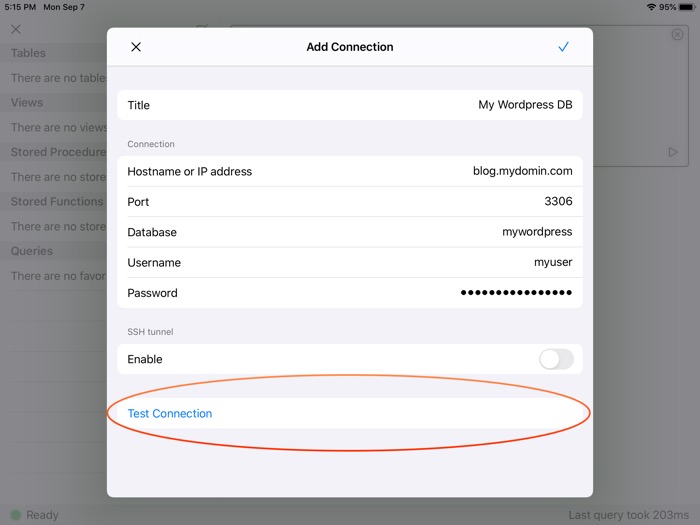
Now that you've entered all the information, test the connection by tapping the button "Test Connection". A dialog "Verifying connection" will appear, probably very briefly. If it stays up for long, that could indicate either a poor internet connection, or that either the hostname or port is invalid. In either case, you'll get to know.

Figure 3: An example connection. Encircled you find the "Test Connection" button.
Assuming that you've entered the correct data, the dialog disappears, and that means everything validated correctly. You can save the connection by tapping the confirm button in the top right corner. When you tap confirm, MySQL Commander will briefly validate the connection. Then you will see the main screen again, now populated with your new MySQL connection. Tap it, and you'll be connected to it, and ready to explore it and do whatever you need done to your database.
When I write hostname here, that usually looks like a string with dots between it, like "mydatabase.mydomain.com". Other times, you might have an IP address, like "192.168.0.10", for instance when connecting to a server on your local network. In this document I'll use the word hostname to refer to either.
When you launch MySQL Commander for iPad, tap the button called "Create new Connection"

Figure 1: The app launched, with the "Create new Connection" in the bottom left

Figure 2: The "Add Connection" screen.
Then let's choose a Title, by tapping the right-hand side of the Title row. Unless you have an external keyboard attached, the iPad keyboard should appear. If you have an external keyboard attached, you can see the cursor blinking on the far right. You can now type the desired connection title.
After that, repeat for the rows "Hostname or IP address", "Database", "Username" and "Password". If your port-number is not the default 3306, edit it to the correct value too. If you have an external keyboard, you can use the tab key to jump between the fields. Otherwise, just tap the row you want to edit.
We're not going to enable an SSH tunnel for now, so leave it disabled.
Now that you've entered all the information, test the connection by tapping the button "Test Connection". A dialog "Verifying connection" will appear, probably very briefly. If it stays up for long, that could indicate either a poor internet connection, or that either the hostname or port is invalid. In either case, you'll get to know.

Figure 3: An example connection. Encircled you find the "Test Connection" button.
Assuming that you've entered the correct data, the dialog disappears, and that means everything validated correctly. You can save the connection by tapping the confirm button in the top right corner. When you tap confirm, MySQL Commander will briefly validate the connection. Then you will see the main screen again, now populated with your new MySQL connection. Tap it, and you'll be connected to it, and ready to explore it and do whatever you need done to your database.